Recent Posts
Wow, it's getting hot in here!
3/31/2023 (Permalink)
 These pictures show different methods of cleaning your air conditioning unit.
Wow, it's getting hot in here! You don't want to have to say these words. Now that spring has arrived, you should consider getting your HVAC’s external unit (Condenser and Compressor) ready for our hot summer days.
Preventative maintenance for HVAC systems
Regular maintenance can help you save a substantial sum of money. Properly maintained, an HVAC system, interior, and exterior can last over a decade without any need to replace major components.
Just like your interior HVAC system, the HVAC’s external unit (Condenser and Compressor), needs a regular air conditioning service schedule to keep it in top condition. The condenser is one of the most critical parts of the air conditioner system, and you need to keep an eye on it for faults and mishaps. It is suggested to periodically hire a professional to have the AC inspected. A well-trained technician will find and fix problems in your air conditioning system.
DIY PREVENTATIVE MAINTENANCE:
You can do some maintenance of your own. The following are some of them. You can go beyond what is listed by googling DIY AC maintenance. Here you will find many sites that will give you more maintenance suggestions.
Cleaning the external unit (Condenser and Compressor)
Step 1 – Power Off the Unit/Mains
Safety first. You need to make sure that power is not running through the unit when you are going to clean it. You can get this done either by removing the breaker/block or by moving the switch to the off position. If you think that is hard to do, you can also turn off the power to the air conditioner condenser at the main electrical panel.
Step 2 – Clear debris and areas around the unit
Keep the area around the condenser free of plant growth. Clean the surrounding area by removing all loose dirt, leaves, and other debris with at least a 2-foot radius around the unit.
The condenser fins are where most of the debris will get stuck, and you need to carefully clean this away. Ideally, you could use a rough paintbrush to remove the debris that is easy to dislodge. After this, you could clean the finer debris with your vacuum cleaner and the brush attachment.
Step 3 – Cleaning the Condenser Fan
This is also an area where a lot of dust and debris can accumulate over time and it needs to be cleaned at regular intervals. There are chances for leaves also to get stuck here. The easiest way to get it cleaned is by wiping it down with a damp cloth and then letting it dry in the sun.
Step 4 – Cleaning Fins Inside Out
Use the brush attachment on a powerful shop vacuum to remove all outside dirt. Then, using a gentle stream from a garden hose, spray through the fins from the inside out to remove any built-up dirt or debris from between them. Never use a pressure washer, since the pressure can damage the fins.
If the fins are particularly dirty, use a commercially available fin cleaning spray available at home improvement centers. Read and follow manufacturer directions.
How far you want to go with DIY maintenance is up to you. It all depends on how handy you are. If the unit is under warranty, verify that any maintenance you do is not going to cancel the warranty.
Now you can have a cool summer! Enjoy!
Source: Hgtv.com and A Ryan
ONE OF THE MOST COLORFUL TIMES OF THE YEAR!
10/3/2022 (Permalink)
 A cat is enjoying all of the fall colors!
YIPPY …Autumn is a second spring when every leaf is a flower. Next to spring, it is one of the most colorful times of the year! What a wonderful uplifting season. How about a hayride or cornfield maze?
Beautiful falling leaves (Rake. Pile. Jump. Repeat), sweaters, and the smell of bonfires in the air. Ooooh; pumpkin spice! Pumpkins, gourds, and harvest corn. Let us not forget colorful fall flowers and cornstalks to frame our entryways!
Witches, Goblins & Ghouls, Oh My! Soon Halloween will be here…EEEEK! Time for decorating to scare the kiddies. Don’t forget the CANDY!
Then it will be time to stuff our faces, (gobble-gobble) until our tummies pop! Happy Thanksgiving!! It is a time for family, turkey, and football. Remember; There is always something to be grateful for.
- Autumn shows us how beautiful it is to let things go
If you don’t talk politics, you will get pie.
Enjoy the season everyone!
STOP YOUR SPIGOT (OUTDOOR FAUCET) FROM FREEZING
12/27/2021 (Permalink)
 This photo shows various types of covers for your spigot (outdoor faucet).
Freezing water in pipes can create costly damage. Spigots (outdoor faucets) in particular are prone to this kind of damage. It helps to prepare your spigots for winter before freezing temperatures arrive. You can do this by taking a few easy steps before winter arrives.
Close the Outdoor Supply Valve
Many outdoor spigot(s) have an indoor safety valve that allows you to drain the water from the outdoor section of the pipe, reducing the chance of the pipe bursting when trapped water freezes. Shutting off the water to your outdoor pipe is also handy if you need to replace the spigot or outdoor section of the pipe. You only have to turn off the safety valve for that fixture instead of shutting off water to the entire house.
- Find the pipe inside your house that leads to your outside spigot(s). This may be in your basement, garage, or crawl space.
- Shut off the water supply to your outside spigot(s). Look along the length of the pipe for the safety shut-off valve. Most valves are either round, metal knobs or straight handles that are 3 to 4 inches long. In some older homes, the shut-off valve may be a square post (no handle/knob) at the top of a pipe junction. You can use clamp vise-grips or pliers onto the square post and turn it clockwise until it stops.
Remove Attached Hoses and Empty the Outdoor Pipe
- Go outside and remove any hoses that may be attached to the outdoor spigot(s). Empty them of any remaining water, and store them in a safe place such as your garage.
- Turn on the exterior spigot(s) until the water stops flowing. This releases water trapped in the pipe, which reduces the chance of the pipe(s) freezing and allows you to safely replace or make any repairs to the existing spigot(s), if necessary.
Cover Pipe with Insulation
To protect your outdoor spigot(s) and pipes from sub-zero temperatures, you need to insulate them. Cover the spigot(s) and exposed pipe with the insulation of your choice.
- There are various options for insulating your pipes. They include fiberglass and foam insulation sleeves that are made to fit around piping. There are also heating tapes on the market that you can wrap around any size.
- For the spigot(s), there are outdoor spigot covers. These are generally made of foam, plastic, or insulated outdoor sock covers.
You can find most of these products in home improvement centers.
Tip: Any pipes running through unheated places such as basements and attics must also be insulated.
Tip: If you have underground sprinklers, make sure to drain them out as well by following manufacturer recommendations.
HERE COMES THE COLD!
12/25/2021 (Permalink)
Winter is coming upon us. Unfortunately, so will ice dams on our roofs.
Listed below are a few inexpensive solutions you can do yourself.
How to help get rid of ice dams
Once you have ice dams on your roof, your goal should be to eliminate them as quickly as possible to prevent any further damage to the exterior and interior of the house.
1 – ICE MELT SOCKS
1) A few pairs of nylon stockings.
2) A bucket (bag) of Calcium Chloride ice melt.
3) Scissors.
Cut the “leg” part off the stockings, and fill them up with 2-3 pounds of ice melt and tie the ends. That’s it.
Next, go up on the roof, and put ice melt socks vertically, one end onto the gutter and the other end up the roof slopes, spacing them every 3 feet. BE VERY CAREFUL WHEN DOING THIS! The socks will create a melt channel in the ice to allow the water to run off your roof. You can also place the socks into the gutters to prevent ice build-up there.
2 – SNOW RAKE
With a snow rake. You can remove snow off your roof before it melts and freezes along the eaves will minimize the effect of ice dams. Try to get rid of as much snow as you can without causing any damage to shingles.
This snow rake has two rollers on the bottom edge as well as a plastic sheet to help snow slide off the roof fast. The plastic sheet helps prevent damage to the shingles.
The rake is sturdy solid aluminum and lightweight. This makes it easy to use by most people.
3 – ICE MELT PUCKS
This product is the same as ice melting socks above. It is made from Calcium Chloride and is sold online, or at home improvement stores.
These, however, are not very effective. They do not work as well as the “sock” and can easily be blown off the roof. Unlike the sock, they just melt the ice around themselves and do not create a path for water to flow down the roof. You will need to use many pucks to get the desired effect.
Only you can decide if ice melt socks, pucks, and/or a roof rake are a good way to deal with ice dams.
If you’d rather not use them, some alternatives worth considering include:
These will require professional installation.
- Ice melting heat cables.
- Extra insulation in your attic to help prevent heat from escaping through the roof and causing ice dams in the first place.
- Ice metal panels that can better shed ice and snow from roofs.
EMERGENCY CAR KIT
12/21/2021 (Permalink)
You never know when something happens to your car, RV, motorcycle, etc. They can break down anywhere. Freeway, highway, in the middle of nowhere. You could be snowbound.
This is why it is best to be prepared. The following are items that you should keep in your car, motorcycle, RV, etc.
EMERGENCY GEAR
Jumper Cables (8.5 ft)
Air Compressor (12V, 150 PSI)
Auto Tester (optional)
Fuse Tester
Fuse Kit
Tow Rope
Tire Repair Kit
Tire Pressure Gauge
Reflective Warning Triangle
Electrical Tape
Bungee Cord
Cables Ties
Work Gloves
Reflective Safety Vest
Folding Digging Shovel
OR the better option
Folding Multifunctional Tactical Shovel (various styles to choose from)
- The majority comes with a fire starter, wrench, knife, screwdriver, hammer, saw, hook, ax, rope cutter, bottle opener, nail puller, whistle, fish scaler, hacksaw, ice piton, and window breaker, etc.
Multi-function Blade (Tactical Shovel includes this)
Multi-Tool (Some Tactical Shovel includes this)
Survival Whistle (Some Tactical Shovel includes this)
Emergency Blanket(s)
Rain Coat
Compass (Some Tactical Shovel includes this)
And last but not least – a First Aid Kit
This may seem like a lot, but you and your family are important and worth it.
BE SAFE OUT THERE!
BRING ON 2022!
12/17/2021 (Permalink)
Hopefully, this year will be better than 2020 & 2021. Record-breaking crime throughout the US, vaccine mandates, supply shortages, and skyrocketing costs for goods and gas. Ugh. We can only hope for the best. But heads up everyone. Think positively! We are a strong nation and must stand up for what is right.
We’re at our best when we support each other. Not when we cancel each other out for our past mistakes, but when we help each other grow. Joaquin Phoenix, Actor
It is your right to choose what you do and don’t do, to choose what you believe in and don’t believe in. It is your right to curate your life and your own perspective. Lady Gaga, Musician and Actor
HAVE A WONDERFUL SAFE NEW YEAR!
HAPPY HOLIDAYS EVERYONE!
12/1/2021 (Permalink)
 She is trying to look innocent laying in front of the tree. Did she succeed?
We do love our Christmas trees with all the ornaments and lights. However, there are a few things to keep in mind when purchasing and decorating your tree.
Christmas Trees
If you own or are buying an artificial tree, look for a fire-resistant label. When putting it up, keep it away from fireplaces, radiators, and other sources of heat, including candles.
If getting a live tree, make sure it’s fresh by bending the needles up and down to make sure no needles fall off. Water daily to keep it fresh. If you have dogs and/or cats, you know that they love to drink tree water. Make sure to check the water frequently.
Decorations
If using older decorations, check their labels. Some older tinsel is lead-based. If using angel hair, wear gloves to avoid irritation. Avoid breathing in artificial snow.
Lighting
Check all holiday light cords to make sure they aren’t frayed or broken. It’s also best to check that all of the lights are working before you put them on the tree. Don’t string too many strands of lights together—no more than three per extension cord. Don’t use electric lights on metallic trees. And please don’t forget to turn off all holiday lights when going to bed or leaving the house.
From all of us at SERVPRO® of Winnetka/Wilmette/Skokie, we wish you a very merry and safe holiday season!
Sources: ARyan
LET’S GET READY FOR SUMMER!
6/4/2021 (Permalink)
 This picture depicts yummy food being cooked outdoors on a grill. mmmmm
We all want a relaxing fun summer. However, there are things that should be taken care of before the fun can begin.
- Trim your trees. Clean up your yard by directing the growth of your branches
- Clean your gutters and drains
- Check your downspouts to make sure water is guided away from your property. If they are cracked or smashed, replace them.
- Check your hose
- Check out the deck and patio.
- Replace any broken and/or rotting wood, popped nails, and screws.
- Sweep the deck and use a deck cleaner. Now it is time to use a sealer or stain. Always use sealers and stains that are meant for decks.
- If you have pavers, replace, fix broken or missing ones. Sweep and clean.
- Wipe down exterior lights
- Replace old weatherstripping
- Wash your windows
- Turn your ceiling fan counterclockwise
- If your home needs new or additional insulation now is the time to do it.
- Have your chimney cleaned
- Give your BBQ a deep clean. Give your outdoor grill a good clean before you begin using it regularly again. LET'S EAT!
NOW IT’S TIME TO ENJOY SUMMER TO ITS FULLEST!!!
Source: Google and ARyan
Cigarette Tar and Odor
6/4/2021 (Permalink)
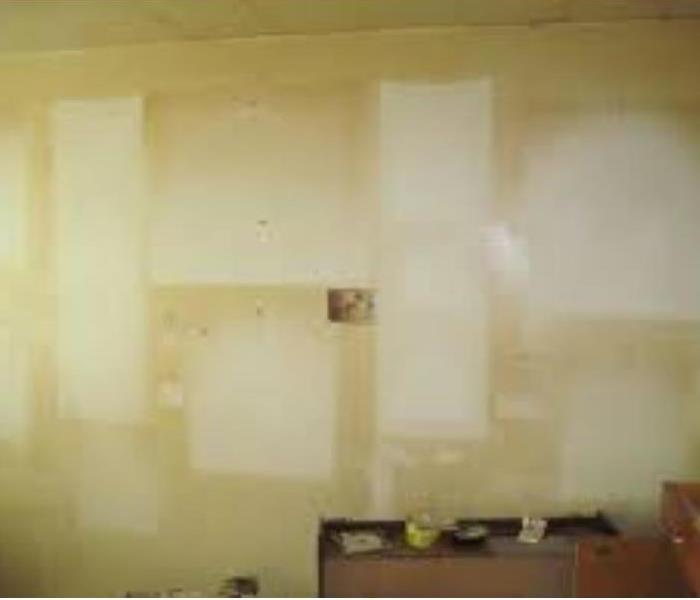 This picture shows you the sticky discoloring tar that cigarette smoke has left on the walls. The white areas are where pictures hung.
We are often asked if they can remove cigarette or tobacco smoke odors. For instance, a home may need to be cleaned and deodorized when it is being sold; an apartment may need the service between tenants. Cigarette odors not only ruin the resale value of your property, but they're harmful to your health.
The smoke from tobacco clouds the air and sticks to every surface of the area. People can also see, smell, and feel a yellowish-brown, sticky substance that is left on all surfaces and furniture in areas where smoking has taken place. It is extremely hard to remove residue discolors on painted surfaces and plastics. It can permanently change the appearance of wallpaper, blinds, paint, and many other items in the area. The smoke can penetrate furniture, carpets, walls, windows, and every other nook and cranny in the area. And the home’s HVAC system will carry the smoke odor and the residues throughout the structure
The smoke from a fire is sometimes much easier to remove from walls or other surfaces than tobacco smoke. Removing tobacco residues can be a real challenge. It is very time-consuming, as residues are present throughout the entire home.
The only effective way to remove tobacco residue and the smell that comes along with it is through very thorough cleaning and then sealing with a sealant designed to lock in the very last of the stains and odors of all structural surfaces. Hydroxyl generators or ozone generators may be used. Both are professional equipment that creates molecules that can follow the smoke into tiny spaces, and both processes effectively destroy the malodorous particles.
SERVPRO® of Winnetka/Wilmette/Skokie professionals will bring your property back to a preloss condition...
"Like it never even happened."®
MOLD AND HOMEOWNERS INSURANCE
6/2/2021 (Permalink)
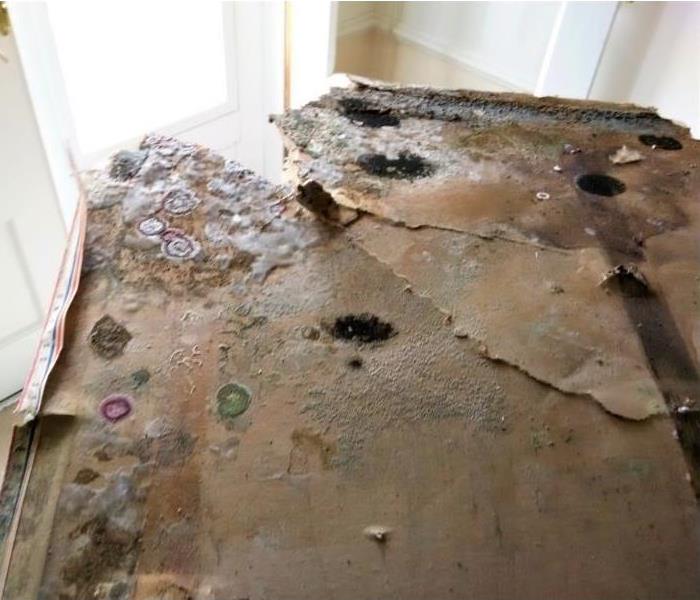 This picture shows mold growth that developed on the backside of the drywall. This normally occurs from an ongoing leak in the ceiling.
A question that we often are asked here at SERVPRO of Winnetka/Wilmette/Skokie is "Are there insurance plans that will cover you from the cost of a mold remediation project?"
So, does homeowners insurance cover mold? The answer is...Sometimes.
Does Homeowners Insurance Cover Mold?
Homeowners' insurance does not usually cover mold damage. Your insurance company sometimes has separate coverage for mold with a limit as to what is paid out.
That being said, there are some instances where the cost of mold remediation can be covered by the insurance carrier. These instances generally occur when the source of the mold is due to an incident that the homeowners' insurance policy does cover. For example, if mold has grown due to an accidental pipe break, sump pump failure, or water that's been used to put out a recent fire has caused mold to occur, your homeowners' insurance could cover the mold damages. On the other hand, if mold has grown due to improper maintenance practices such as ongoing high humidity content or a continuous leak (roof or foundation leak), homeowners insurance will likely not cover the damages.
How To File a Homeowners Claim for Mold
The first step in filing a claim is to call your insurance carrier as soon as the suspected mold is discovered to inform them of the damages and the source of the issue. Once you speak with your insurance carrier they will advise you if you have coverage. If so, they will provide you with the next steps, you can begin to gather the evidence. You can do this by taking several pictures of the source of the issue, as well as any apparent mold growth. Keep in mind that mold only needs 72 hours to begin to grow.
Your insurance company most likely will require you to get the affected areas tested. The test will determine if there is mold, how many mold spores, what type of mold, and a protocol of what should be done to remediate the mold. Once you receive the results, call SERVPRO of Winnetka/Wilmette/Skokie at 847-600-0102 for mold remediation services. Our technicians are certified in mold remediation.
SERVPRO of Winnetka/Wilmette/Skokie will then come to your home to go over the scope of work, take pictures, and measurements. We will then supply you and your insurance company with an estimate for the required work. We will also work with your insurance carrier to determine if the necessary coverages are available to you.
Call the professionals at SERVPRO of Winnetka/Wilmette/Skokie at 847-600-0102 if you suspect mold growth in your home.
 24/7 Emergency Service